Difference between revisions of "Lulzbot Mini"
Jump to navigation
Jump to search
(Created page with "Placeholder") |
|||
| Line 1: | Line 1: | ||
__NOTOC__ | |||
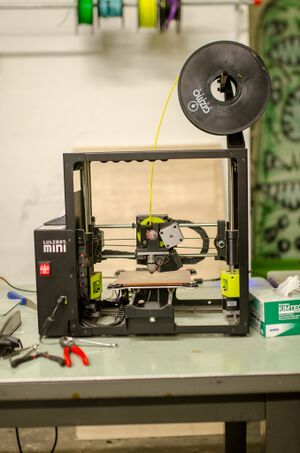
[[File:Dsc_4075_24495006243_o.jpg|thumb|right|300px]] | |||
= Zone = | |||
01: [[3D Printing]] | |||
= Owner(s) = | |||
* Freeside | |||
== Permissions == | |||
For general use by members. Treat equipment as if it were your own and put away as or better than you found it. | |||
== Restrictions == | |||
TODO: specify all the restrictions | |||
* Use only with members-only terminal connected to Mini | |||
* Use with 3mm ABS, PLA, and HIPS filament only | |||
= About = | |||
Freeside was one of 32 hackerspaces to win this printer as part of the 4th annual [https://www.lulzbot.com/learn/announcements/4th-annual-hackerspace-giveaway LulzBot hackerspace printer giveaway] | |||
= Basic Instructions = | |||
TODO: complete instructions on use | |||
* Log in with your credentials to the attached members-only terminal. | |||
* Wipe the PEI surface with denatured alcohol to remove dust and skin oils which will prevent bed adhesion. | |||
* Open up Cura. Select the print quality and filament type you are printing in. You can go into expert mode if you are confident enough, but the stock settings print great. | |||
* Once your print is finished, '''wait''' for the bed to cool down. It will automatically push forward when it is at temperature. Then '''gently''' remove your print from the surface. Be careful not to scratch, peel, or damage the PEI surface! | |||
* Turn off machine when done. | |||
== Basic Operational Knowledge == | |||
* How to slice and send a job to it | |||
* How to abort a failed job | |||
* How to properly remove a print once it has completed | |||
* How to load and unload filament (optional, but you'll be stuck with the loaded plastic type and color) | |||
== Advanced Operational Knowledge == | |||
There are some more advanced tasks that not everyone needs to know to | |||
print, but needs to know to troubleshoot: | |||
* How to tighten belts, fix misaligned axises, replace worn out parts, etc. | |||
== Specifications and Detailed Instructions == | |||
TODO: complete specifications, links to documentation, etc. | |||
* [http://www.lulzbot.com/support/guides LulzBot Support Guides] | |||
* [http://www.tested.com/tech/3d-printing/553684-testing-lulzbot-mini-3d-printer/ Testing the LulzBot Mini] A review by Michelle | |||
* [http://download.lulzbot.com/Mini/1.0/documentation/manual/LulzBot_Mini_manual.pdf Direct link to manual PDF] | |||
= Warnings = | |||
TODO: specify warnings | |||
== Safety == | |||
TODO: specify safety requirements | |||
Latest revision as of 13:59, 23 June 2016
Zone
01: 3D Printing
Owner(s)
- Freeside
Permissions
For general use by members. Treat equipment as if it were your own and put away as or better than you found it.
Restrictions
TODO: specify all the restrictions
- Use only with members-only terminal connected to Mini
- Use with 3mm ABS, PLA, and HIPS filament only
About
Freeside was one of 32 hackerspaces to win this printer as part of the 4th annual LulzBot hackerspace printer giveaway
Basic Instructions
TODO: complete instructions on use
- Log in with your credentials to the attached members-only terminal.
- Wipe the PEI surface with denatured alcohol to remove dust and skin oils which will prevent bed adhesion.
- Open up Cura. Select the print quality and filament type you are printing in. You can go into expert mode if you are confident enough, but the stock settings print great.
- Once your print is finished, wait for the bed to cool down. It will automatically push forward when it is at temperature. Then gently remove your print from the surface. Be careful not to scratch, peel, or damage the PEI surface!
- Turn off machine when done.
Basic Operational Knowledge
- How to slice and send a job to it
- How to abort a failed job
- How to properly remove a print once it has completed
- How to load and unload filament (optional, but you'll be stuck with the loaded plastic type and color)
Advanced Operational Knowledge
There are some more advanced tasks that not everyone needs to know to print, but needs to know to troubleshoot:
- How to tighten belts, fix misaligned axises, replace worn out parts, etc.
Specifications and Detailed Instructions
TODO: complete specifications, links to documentation, etc.
- LulzBot Support Guides
- Testing the LulzBot Mini A review by Michelle
- Direct link to manual PDF
Warnings
TODO: specify warnings
Safety
TODO: specify safety requirements
