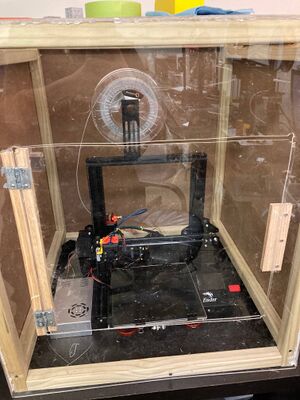
High Temp Printer
Zone
01: 3D Printing
Owner(s)
- Griffin Brown
Permissions
For general use by members. Maintenance beyond changing filament not allowed except if given permission. Treat equipment as if it were your own and put away as or better than you found it.
Restrictions
- Use only after being given usage instructions
- Use with 1.75mm ASA only. PC, Nylon, and other similar materials may be possible in the future.
- Use the custom Cura profile only to print with this machine (TODO: provide profile file, make profiles for other slicers)
About
This is a Creality Ender 3 frame with an SKR Mini E3 V2 mainboard, custom hotend solution using a Slice Engineering Copperhead and PT1000 thermistor, and second Z axis lead screw. This printer was made specifically to printer higher temperature materials well so it has no cooling fan, although the 40mm heatsink fan does cool the parts a small amount. The printer has an enclosure around it to prevent warping. It has worked well to date and heats up sufficiently to fulfill its purpose on this Earth. This printer is still a bowden setup but the Capricorn tube means it uses very little retraction. This machine has a USB port and full size SD card on the right and a Micro-SD card slot on the front. It is recommended to use a USB flash drive.
Basic Instructions
- On any computer you are allowed access to, open Cura and load the high temp printer profile provided on this page.
- Drop your STL file into the slicer and slice as normal. Write the file to a USB flash drive or SD card.
- Insert the USB flash drive or full size SD card. A message will appear to confirm this. A message may or may not show if using a Micro SD card, but using a Micro SD card is not suggested.
- Click the "Print" button and select your file. Be sure to watch the machine during the heat up process and first layer. Heating PID gains are fairly tuned now but these high temps are more likely to throw errors or worse during heat up. Failures are frequent on the first layer, too.
- Wait for the print to cool after finishing and remove it from the glass plate.
- Turn the machine OFF after printing.
Basic Operational Knowledge
(TODO: This whole section)
- How to apply Magigoo
- How to slice for glass beds and high temp materials
- How to abort a failed job
- How to properly remove a print once it has completed
- How to load and unload filament (optional, but you'll be stuck with the loaded plastic type and color)
Advanced Operational Knowledge
This is a loanation and a fairly custom machine. Any advanced use will only be permitted on a case-by-case basis because of this. Just print ASA on it and be graced by the hotness.
Cura Preconfigured Profiles
(TODO: Upload Cura print profile(s))
Other Preconfigured Profiles
(TODO: Slic3r profile) (TODO: Simplify 3D profile) (TODO: PrusaSlicer profile)
Print Profiles
(TODO: Fill out based on uploaded files)
Filament Profiles
This machine only uses ASA at the moment. Other filament profiles may be added for PC, Nylon, ABS, etc. Just print at 270C on the hotend and 100C on the bed.
Specifications and Detailed Instructions
TODO: complete specifications, links to documentation, etc.
Warnings
TODO: specify warnings
Safety
TODO: specify safety requirements
- This is a high temp printer. The bed gets hot enough to boil water, therefore it can easily burn your hand. The hotend get even hotter than other printers, it will seriously burn your hand.
- This printer is incredibly custom. The electronics are mostly cleaned up, but at the moment, the power supply isn't tucked away. Be very careful if your hands are anywhere in the left side of the enclosure. It is absolutely possible (but unlikely) to shock yourself.
