PETGiraffe
Jump to navigation
Jump to search
Zone
01: 3D Printing
Owner(s)
- Freeside
Permissions
For general use by members. Maintenance beyond changing filament is not allowed except if given explicit permission. Treat equipment as if it were your own and put away as or better than you found it.
Restrictions
- Use with 1.75mm PETG only.
- Use the default Ender 3 PETG Cura profile to print on this machine (TODO: provide profile file, make profiles for other slicers)
About
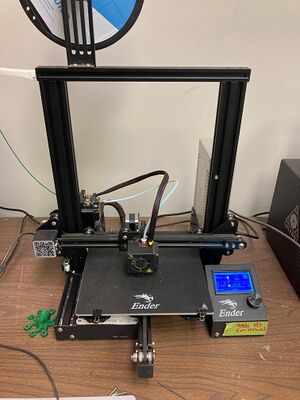
This is a Creality Ender 3. It has a 220mm x 220mm x 250mm print volume. This machine is set aside to print PETG specifically. It is bowden so stringing is something to be aware of.
Basic Instructions
- Remove the Micro SD card from the printer. Use this SD card and this SD card only. Do not use your own or swap them between machines.
- On any computer you are allowed access to, slice your file and drag it onto the SD card for this printer.
- Reinsert the SD card into the machine. If the machine does not recognize it, click the menu option stating "Init TF Card" or similar.
- Navigate to your file under the "Files" menu and begin print
Basic Operational Knowledge
- How to home:
Under the "Control" menu, home one or all axes
- How to slice and send to the printer:
See above or this link (TODO: link good tutorial on slicing for COTS Marlin machines)
- How to abort a failed job
Click the wheel and select the "Pause print" or "Cancel print" option, the former only stopping until the user resumes. The latter completely stops a print.
- How to properly remove a print once it has been completed
Remove the flexible bed and wait for it to cool. If the print is not yours, set the bed aside and do not remove the print. Replace the print bed with another. (TODO: get more beds)
- How to load and unload filament
 Under the "Control" menu, select "Preheat PLA", and if prompted, select "Hotend only"
 When at temperature, go to the "Control" menu, select "Move axis", and select "Extruder"
 Retract the filament a few centimeters. Push the lever on the extruder and pull the filament from the bowden tube out.
 Pull off the spool and replace it with a new one
 Use the lever again to push the new filament into the hotend
 Wait a few seconds and use similar steps as above to begin extruding some filament
 If all looks good, disable the hotend using the interface
 If something went wrong, contact someone who may be able to help
Advanced Operational Knowledge
PETG is stringy and sometimes annoying when changing filament. Cold pulls are recommended but not suggested for beginners. (TODO: link to cold pull tutorial)
Cura Preconfigured Profiles
(TODO: Upload Cura print profile(s))
- PETGIraffe Standard - Uses 0.2mm layer heights and a small brim to prevent warping. This is a good all around profile.
Other Preconfigured Profiles
(TODO: Slic3r profile) (TODO: Simplify 3D profile) (TODO: PrusaSlicer profile)
Specifications and Detailed Instructions
TODO: complete specifications, links to documentation, etc.
Warnings
- This machine can only use PETG. Do not use PLA *EVER*. Do not print higher temp materials on PETGiraffe, use the High Temp Printer for that.
- Please resist the urge to level this printer. The level should hold for quite a few prints. Leveling is permitted but should not be commonplace.
- PETG is stringy. It's sometimes annoying to print with or may produce undesirable surface finishes on some parts. Do some reading to make sure PETG is the filament for you.
Safety
- General 3D printer safety applies.
Proposed Improvements - Anybody is welcome to offer help with these!
- Hotend heatsink fan is damaged and needs replacing
- A Pi for Octoprint
